 |
Toyama Ryu Batto Do Konjaku Kioi Dojo (Ancient and Modern Fighting Spirit Dojo) |
5980 66th St N Suite M St Petersburg FL 33709 Email: info@toyama-ryu.com Phone: 727-329-9679 |
|
Home
|
Sharpening GuideSharpening a sword is risky to both yourself and your sword. If you insist on doing it yourself, don’t blame us for the loss of fingers the destruction of your sword. Don’t even think about sharpening a sword that could be a valuable heirloom. You could be destroying an irreplaceable piece of history and costing yourself hundreds of thousands. A PK or rusty gunto is a good place to start. Practicing with 2000 grit or finer stones makes it harder to destroy the geometry of the blade, but you should expect to destroy the first blades you try to sharpen. The good news is that the dojo also offers a professional sharpening service that may be able to recover your project. The dojo store offers a wide range of Japanese Water Stones and holders.
GritThe first thing everyone asks is what grit stones are used to polish or sharpen a sword. What could be easier than selecting grit? Is that US, European, English, or Japanese grit? Grit specified the mesh used to separate the abrasive particles, but everyone uses a different standard and they don't compare well. Things really fall apart at the finer grits since the US standard switches from grit to particle size in microns. The following table will give you some clues on how to relate the different standards. From this point we will use the Japanese grit since Japanese water stones graded by this standard. Equivalent Grit Table
A series of stones ranging from about 800 to 12000 grit are used to sharpen blades in good shape. If a blade is badly shaped or has chips to remove, stones down to 80 grit can be used. Don't jump too far between grits or you will be unable to remove surface scratches.
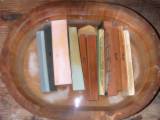
Japanese Water StonesJapanese water stones are either natural or artificial. Natural stones can be quite expensive, but artificial stones can be used for sharpening polish. About half the stone used in a full cosmetic polish can also be artificial, but some steps require specific natural stones. Artificial stones use a graded abrasive suspended in either a clay or ceramic media. The stones use water as a lubricant. Even the inexpensive stones can run $50 each.
Soaking the Stones
Shaping the StonesJapanese water stones constantly wear down during use. This is normal and helps maintain an aggressive cutting surface. Some stones wear down quite quickly while other stones are quite stable. Stones used to sharpen a sword should be slightly convex and have rounded corners. The stones will become concave (hollowed out) during use so they should be reshaped before or after each use. Special stones are available for keeping your stones true, but you can use each stone to flatten the next finer grit stone when switching grits. Keeping the edges rounded or beveled will keep the stone from fracturing and help keep you from grinding a grove in your blade.
Sharpening Base
Straightening the BladeYou might have to straighten the blade before you sharpen it. This is your last chance. Once you start sharpening, the geometry will be lost. Straightening a sword is an art in itself. The simplest method but hardest to master is simply bending it over your knee after sighting down it’s length. There are slotted wood sword straightening tools available that allow you to isolate the bend easier. Whatever method you choose, just remember to take your time.
Getting a Grip
Sharpening
Scratch PatternThe first stone should be used until the scratch pattern just reaches the edge. The only exceptions are when removing chips or when the edge has been flattened. The geometry should be established with the coarsest stone and subsequent stones should just refine the surface. The angle of the scratch pattern of each stone can be varied to make sure all the scratches from each stone are removed by the next. Holding the blade up to the light will reveal scratches from previous stones cutting across the pattern. Cosmetic polishes alternate the pattern by 90 degrees to make sure every scratch is removed.
Leave the EdgeThe most common mistake is paying too much attention to the edge. All your attention should be on the surface of the blade. The surfaces must be removed to reveal the edge. The first stone is key. The surfaces should be worked until the scratch pattern reaches the edge while maintaining the desired surface geometry. You must keep working with the first stone until the scratch pattern reaches the edge. There may be only a very thin polished surface that reflects the light, so look very carefully. If the edge has been flattened or chipped, you need to continue past this point.
100 StrokesOnce you have established the geometry with the coarsest stone, use 100 strokes of each stone on both sides of the blade to refine the surface. Use long strokes that cover about 15 inches of blade. The geometry comes out more uniform this way. That also means that the entire monouchi can be covered in a single stroke. The blade is rotated very slightly to cover the entire surface from the shinogi to ha.
Rounding the ShinogiIt is key to not round over the shinogi. This is the line that runs down the length of the blade delineating the cutting surface. The blade will need to be worked right up to the shinogi line, but it is very easy to turn the blade too much and destroy the geometry of the blade. The blade has a tendency to roll over and round the shinogi due to its curvature. You can hear when the stone is working the shinogi or ha. The tone of the scraping changes slightly as you reach the edge. Be careful!
LubricationSlurry is formed on the top of the stone as it breaks down. This paste acts as a lubricant and as an abrasive. The stone needs to be periodically re-wetted. Use water with dissolved baking soda to keep the stone wet. Don’t wash the paste off the stone. Use your hand to dip water onto the stone and keep the blade clean. A small rag can be used, but be careful not to leave thread or other pieces of debris on the stone or blade. You will need to switch water when you switch stones or the coarse grit in the water will leave scratches in the blade. The finer stones need to have a paste formed with a nagura stone to work properly. The nagura stone is soaked with the water stones and rubbed on the top of the finish stones to form a paste.
Power ToolsThe worst thing you can possible do is using a belt sander, orbital sander, or grinder on your sword. That is the fastest possible way to turn that sword into junk. Power tools can quickly remove the temper or destroy the geometry of the blade. Orbital sanders destroy the geometry by rounding over the ha and shinogi. You can wet grinders to reshape badly chipped blades, but they need allot of practice to use. The grinding wheels move slow and are water cooled so the blade does not heat up.
Abrasive PaperSome people use progressively finer grits of silicon carbide sandpaper to sharpen swords. We don’t use that method and perfer water stones. You can get silicon carbide and diamond lapping film that covers the same abrasive grit range as Japanese water stones.
JigsYou can get a wide variety of sharpening systems designed for knifes. These jigs have one big problem. They are all intended to create an edge with a single angle. A katana should have a slightly curved continuous surface from the ha to shinogi. It is not a big knife and can not be sharpened like one. You can get more data about the geometry of a katana by checking out the edge geometry page.
|
 Japanese water stones need to be soaked in water to work properly. Stones
take from 5 to 20 minutes to become saturated depending upon the stone. While
some stones can be stored in water others must be stored dry. You can store
stones dry and soak them for 20 minutes or just leave them in water. You should
put about a
quarter cup of sodium bicarbonate in the water. Baking soda will change the pH
of the water and keep your sword from rusting while you are sharpening it. Some
stones like those from Debado should not be soaked but simply sprinkled with
water before using. These stones will deteriorate if soaked.
Japanese water stones need to be soaked in water to work properly. Stones
take from 5 to 20 minutes to become saturated depending upon the stone. While
some stones can be stored in water others must be stored dry. You can store
stones dry and soak them for 20 minutes or just leave them in water. You should
put about a
quarter cup of sodium bicarbonate in the water. Baking soda will change the pH
of the water and keep your sword from rusting while you are sharpening it. Some
stones like those from Debado should not be soaked but simply sprinkled with
water before using. These stones will deteriorate if soaked. The
Japanese use a sharpening base fit over a wooden basin. A special clamp is
used that is held down with the foot. Westerners are used to standing up
while working and we use use a custom
wood platform that sits on the workbench to secure the stones to. This
elevates the stone above the workbench and keeps you from banging your knuckes. Some stones are already
attached to bases, and you can use one of the standard rubber bases for unmounted
stones. You need a sturdy platform that stands up to the water. You might prefer clamping down
your stones and base, but this is not necessary.
The
Japanese use a sharpening base fit over a wooden basin. A special clamp is
used that is held down with the foot. Westerners are used to standing up
while working and we use use a custom
wood platform that sits on the workbench to secure the stones to. This
elevates the stone above the workbench and keeps you from banging your knuckes. Some stones are already
attached to bases, and you can use one of the standard rubber bases for unmounted
stones. You need a sturdy platform that stands up to the water. You might prefer clamping down
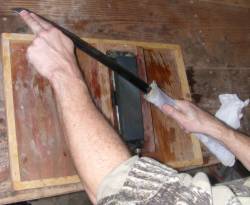
your stones and base, but this is not necessary.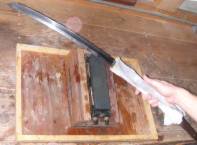 The sword should be disassembled and the bare blade sharpened. Even the
habaki should be removed. A piece of an old towel about 1x1 foot wrapped around
the blade provides a good grip. It has to be tight so it does not slide
(and slice). When working the monouchi, use the right hand to grip the sword
and the left hand to counter the weight of the sword and steady the kissaki. Be
careful of slipping your left hand off the blade or you could loose a few
fingers. Make sure to wipe off any oil. Use two pieces of towel to grip the
sword with both hands when working on other parts of the blade. Remember that it
is easy to cut yourself badly when sharpening a sword.
The sword should be disassembled and the bare blade sharpened. Even the
habaki should be removed. A piece of an old towel about 1x1 foot wrapped around
the blade provides a good grip. It has to be tight so it does not slide
(and slice). When working the monouchi, use the right hand to grip the sword
and the left hand to counter the weight of the sword and steady the kissaki. Be
careful of slipping your left hand off the blade or you could loose a few
fingers. Make sure to wipe off any oil. Use two pieces of towel to grip the
sword with both hands when working on other parts of the blade. Remember that it
is easy to cut yourself badly when sharpening a sword.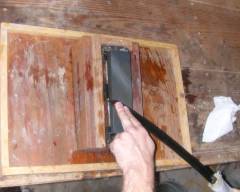
 The blade should pass over the stone using a uniform even stroke. This is
polishing and not grinding! Use both the forward and backward movement to do
the work. Go slow and inspect the blade often. Don’t worry about how the edge
feels. Just make sure you have worked the stone over the entire surface of the
blade while maintaining the surface geometry. A good light source is essential
to seeing where you have missed. Remember that you are not sharpening the edge.
You are removing metal until the edge is exposed.
The blade should pass over the stone using a uniform even stroke. This is
polishing and not grinding! Use both the forward and backward movement to do
the work. Go slow and inspect the blade often. Don’t worry about how the edge
feels. Just make sure you have worked the stone over the entire surface of the
blade while maintaining the surface geometry. A good light source is essential
to seeing where you have missed. Remember that you are not sharpening the edge.
You are removing metal until the edge is exposed.

Copyright © 2006 by Konjaku Kioi Toyama Ryu Dojo, All rights reserved.
Samurai Swords
Iaito (Practice Swords)
Shinken (Cutting Swords)
Wakizashi (Short Swords)
Tanto (Daggers)
Japanese Weapons
Maintenance
Uniforms
Sharpening
Sword Repair
Martial Arts
Dictionary Your Name in Japanese
Dojo Stories
Tatami Targets